
Invoicing Customers for Sales in Business Central
- Alfredo Iorio

- Apr 16, 2023
- 6 min read
Efficient invoicing is critical to any business, regardless of size or industry. A well-designed ERP must allow users to streamline invoicing, enhance accuracy, and optimise business operations.
In this guide, I will discuss the step-by-step process of invoicing sales in Business Central. From how to configure sales categories to the different ways to create sales invoices, manage sales invoices approvals, and even integrate external billing and payment systems.

Why Efficient Customer Invoicing is Critical
Invoicing serves as a means of receiving payment for goods and services and plays a crucial role in managing cash flow, maintaining customer relationships, and providing critical financial records.
Customer invoicing is part of the Order to Cash process which I cover in full details here: Order to Cash Process in Dynamics 365 Business Central
Efficient invoicing means improving time and accuracy. Invoicing at the right time means avoiding delayed payments and reducing customer support requests. For example, wholesale companies often invoice their clients after receiving a Proof Of Delivery (POD) so that users can investigate any difference between goods ordered and received before raising the sales invoice.
Invoice accuracy means invoicing the correct goods or services at the right price, a fundamental necessity for any company. However, invoicing accuracy also includes all the information customers need to process the invoice, for example, terms and conditions, accessory charges, and payment terms.
Overview of Customer Invoicing in Business Central
There are two ways to process a sales invoice in Business Central. Like in other functionalities of this Microsoft ERP, users can design the sales invoicing process according to their business processes. Let's clarify the terminology before we explore how to invoice sales.
Definition of Sales orders, invoices and posted sales invoices
The invoicing process in Business Central begins with a sales document. The two sales document types are Sales Orders and Sales Invoices - also called draft invoices. Although there are differences between these two documents, both can be used as the first step in the sales invoicing process.
The action required to invoice a sales document is called posting; when we post a sales order or invoice, we generate a Posted Sales Invoice. The Posted Sales Invoice in Business Central is the document that generates entries in the general ledger.
Setting Up Customers Invoicing in Business Central
First, let's look at the required setup before covering the different invoicing process methods.
Number series
The first step to enable sales invoicing is to set up the number series for sales documents on the Sales and Receivables Setup page. A common mistake I often see in my consulting work is when companies use the same number series for sales documents and posted sales invoices. Having the same document number for a sales invoice and a posted sales invoice will make company books challenging to audit.

Revenue categorisations: Posting groups and the Chart of Accounts
The second step is to create sales categories to link the posting to the general ledger to the sales transactions. The main accounting transactions involved in the sales invoicing process are Accounts Receivables and Revenues, and we can set up both through Posting Groups.
Accounts Receivables
The Customer Posting Group page setup determines the link between the sales transaction and the amount posted in the AR account.

Each customer must have a default customer posting group; Business Central will validate this field when a user posts the sales invoice and will write a debit entry to the AR account setup on the Customer Posting Group page.

Revenues
The link between sales invoicing and the revenues posted in the income statements is controlled by a combination of two fields: the General Business Posting Group and the General Product Posting Group. The reason behind this design is to allow companies to categorise revenues by customer and product or service.

For example, say we have an invoice for a customer set up with a Domestic General Business Posting Group. The General Product Posting Group field shows Retail for the first line and Service for the second. When we post the invoice, the Retail amount will be posted in one general ledger code and the Service to another as set up in the General Posting Setup Page.

How to Create and Post a Sales Invoice automatically from a Sales Order
The simplest way to invoice a sales document is to use the Post action on the sales order or invoice page. Depending on the setup, the order might contain lines that must be shipped before users can post the document. I describe the shipping process in another article here: The Complete Guide on how to Ship Items.
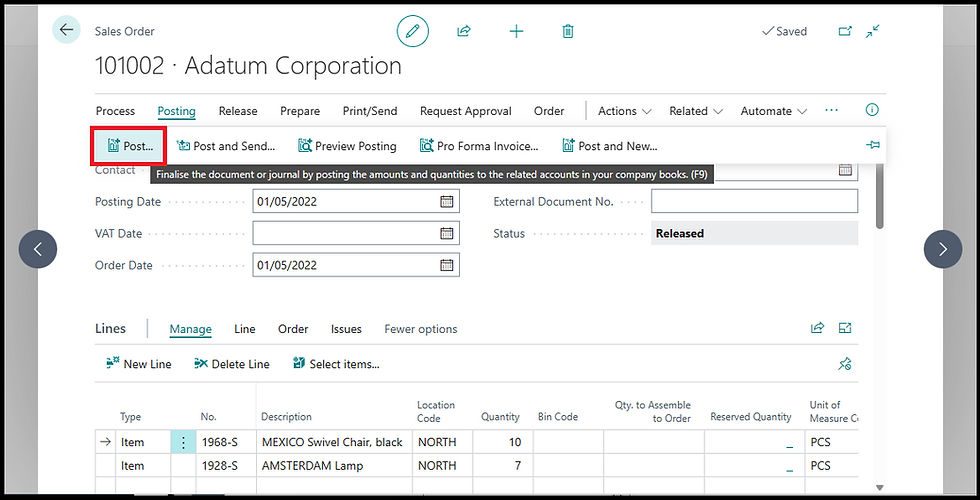
The Post action will perform two jobs: create and post a sales invoice to generate a Posted Sales Invoice. The sales order details are transferred to the sales invoice automatically, as you can see below:

This is the simplest way to invoice a sales document; however, because the process is automated, users should pay attention to some field values before using the Post action, for example, the Posting date.
The posting date of a sales order defines the transaction date in the general ledger entries, and, by default, it is set up to be the date when users create the order. When using the Post action, Business Central will copy the posting date field on the sales document to the posted sales invoice, which might be incorrect.
Some companies receive orders in advance and invoice after days or weeks; here, the invoice generated should not create entries with a posting date of the sales order. There are two options to avoid invoicing with incorrect dates; the first is to update the posting date on the sales document before posting, and the second is to leave the posting date empty so there is no default posting date on the order. The option to default a date or leave it blank is on the Sales & Receivable setup page.

How to Create and Invoice from a Shipment
The next method to invoice a sales document in Business Central is to create a draft invoice and pull down into the invoice the shipment lines from one or more sales documents. This method introduces one more step, the manual creation of the sales invoice (the draft invoice) before posting, and, although it might be unnecessary for small companies with simple order-to-cash processes, this two-steps process comes with many benefits; the most important are:
Segregation of duties: Keeping the invoicing process separate from the order creation and fulfilment can help companies comply with the regulator
Consolidate or partial invoicing: Invoicing from a shipment allows users to part-invoice orders or merge multiple shipments into one invoice.
In Business Central, users can automate the creation of the draft invoice using the Combine Shipment functionality, including posting the sales invoice. Companies can achieve almost full invoicing automation using Combine Shipment and batch posting. I will cover invoice automation in the upcoming posts.
To create a sales invoice from a shipment, we first need to create the draft document and the sales invoice, and we select the customer.

Then, we use the function Get Shipment Lines. This will open a page with all the shipments for the selected customer.

Note that only shipments not fully invoiced will show on this page.

After selecting all the shipment lines we want to invoice, we click OK, and the invoice lines will populate. On this page, we can always update quantities and prices. The only limitation is that we cannot invoice more than what was shipped.
The last step is to post the sales invoice to generate a posted sales invoice. The link between the sales order and the posted invoice is still maintained through the sales lines and not at the header level. This is because the posted sales invoice is linked to multiple orders.

Integrating with External Billing and Payment Systems
Business Central supports integration with payment systems like PayPal or WorldPay. Integration with payment services will include a payment link to the invoice PDF document generated from Business Central.
The process is almost completely automated; the invoice document will show a payment link once the payment service is set up.

Approvals
Business Central supports complex invoicing approvals. The most common is based on the invoice amount or customer credit limit. However, users can design approval workflows using complex logic based on invoice payment terms, currency, or even if the sales document contains one specific item. In the example below, I have an approval workflow based on the payment method Cash On Delivery.

Closing Thoughts
If your team used Business Central and you want to train them so they can utilise the system at it's best, check out our Corporate Training Services


Comments